คลังเก็บหมวดหมู่: คอมพิวเตอร์

หยุด Anti Adblock ด้วย Anti Adblock Killer

สวัสดีครับ ช่วงนี้หน้าฝนแล้ว ฝนตกทีไรน้ำท่วมตลอดเลย บางคนอาจไม่อยากไปเที่ยวไหน นั่งดูหนัง ฟังเพลง หรือจะนั่งเล่นคอมเปิดเว็บไซต์ต่างๆอยู่บ้าน สบายๆ

เว็บไซต์ทั่วไปสมัยนี้ที่มี Content ต่างๆให้เราได้รับชมหรืออ่าน มักจะมีโฆษณาเป็นเรื่องปกติ ซึ่งอันนี้ผมไม่ค่อยจะ Block ซักเท่าไหร่ ถือเป็นรายได้ให้กับทางเว็บไซต์ แต่ก็มีเว็บบางเว็บ ที่มักแฝงโฆษณาบังคับกด หรือ Popup น่ารำคาญมากๆให้กับเรา ถึงแม้เราจะลง Ad-block มันก็จะมี Script ป้องกัน Ad-block เราจะอีก แต่ไม่ต้องห่วงครับ เรามีทางแก้ไขเสมอ

หน้าตาของ Script ที่รู้ว่าเรากำลังใช้โปรแกรม Ad-block อยู่

หากใครเจอหน้าตาแบบด้านบน หรือข้อความคล้ายๆแบบนี้แสดงว่าโดนแน่นอน ซึ่งถ้าเราจะดูก็จะมีวิธีง่ายๆคือ ปิด Ad-block แต่เราก็จะต้องเจอพวก Ad ไม่พึงประสงค์ทั้งหลายซึ่งผมไม่ชอบเลย ดังนั้นเราจึงเลือกทางเลือกที่ 2 คือวิธีจัดการกับมันซะ

บทความนี้ผมจะแนะนำกับ Browser ที่สามารถลง Chrome Extension ได้นะครับ ส่วนมากคงใช้ Google Chrome กันแน่นอน แต่ถ้า Browser อื่นๆวิธีการคงไม่ต่างกันครับ ใช้อ้างอิงได้ เริ่มแรกครับ เราจะต้องมี Extension 2 ตัวสำคัญเลย ตามนี้ครับ

  1. Adblock Plus แน่นอนครับ ต้องมีไว้เพื่อ Block Ad แต่อาจจะต้องลง Filter เสริมเล็กน้อย
  2. Tampermonkey ตัวนี้สำหรับลง Script ให้ตัวจัดการ Anti Ad-block ทำงานครับ

เมื่อมีทั้งสอง Extension แล้วเรามาเริ่มการทำกันเลยครับ เริ่มแรกเลยให้เข้าเว็บไซต์ https://reek.github.io/anti-adblock-killer/ จะเจอหน้าจอแดงๆ แบบนี้

ให้เราเลื่อนๆลงมานิดนึง จะเห็นข้อความแนะนำ Extension ที่ใช้กับ Script กัน Anti Ad-block ครับซึ่งผมแนะนำ Tampermonkey ครับ ส่วนใครใช้ Greasemonkey ก็ไม่เป็นไรครับใช้ได้เหมือนกัน

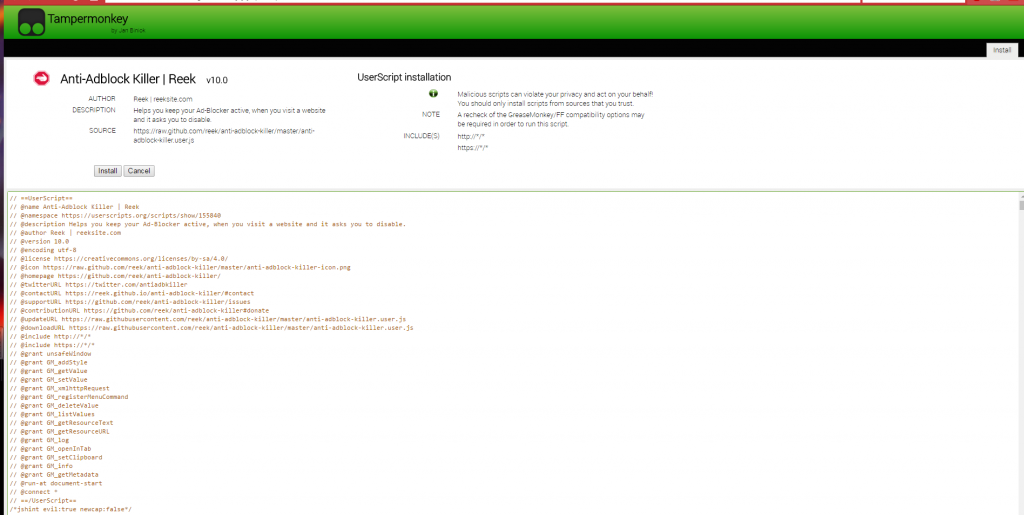
ให้เรากด Install เลยครับ รอแปปนึง จะมีหน้าจอ Script ขึ้นมาให้เรากดติดตั้งอีกทีตามรูปด้านล่างครับ

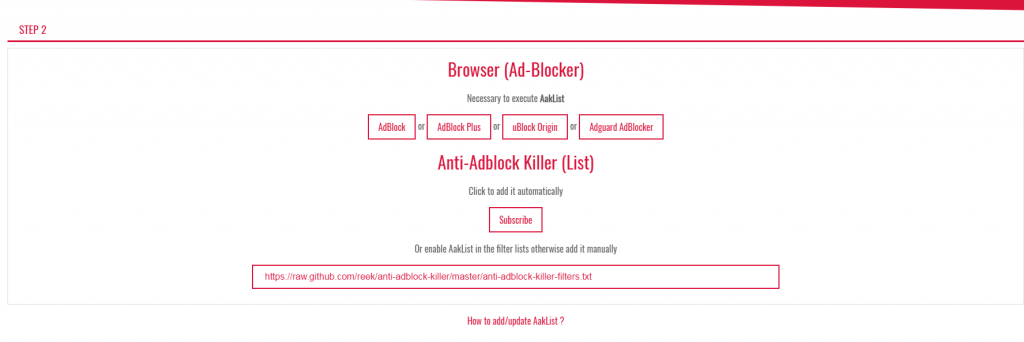
เมื่อกด Install เป็นอันเสร็จสิ้นการติดตั้ง Script ต่อมา ก็ให้เลื่อนหน้าแดงๆ ลงมาอีกนิดนึงจะเป็น Step ต่อไปครับ โดยจะแสดง Extension Ad-block ที่รองรับ อันนี้ผมแนะนำ Adblock Plus ครับ

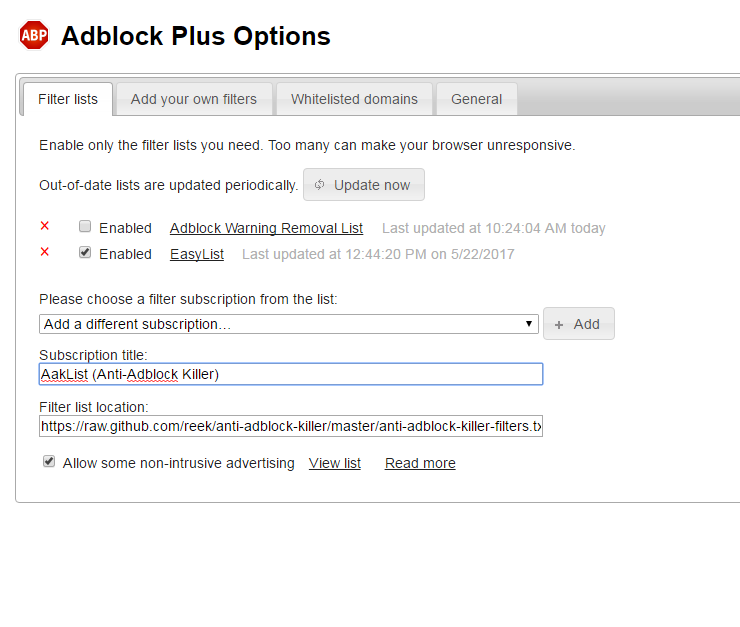
ให้เรากด Subscribe ครับ แล้วจะมีหน้าต่างใหม่แสดงข้อความ ให้เพิ่ม Filter ใหม่ใน Adblock Plus ขึ้นมา

ให้เรากด + Add ครับ แค่นี้ก็เรียบร้อยครับตัว Ad-block จะ Update Filter ให้เองเลย เป็นอันครบถ้วนกระบวนการครับ

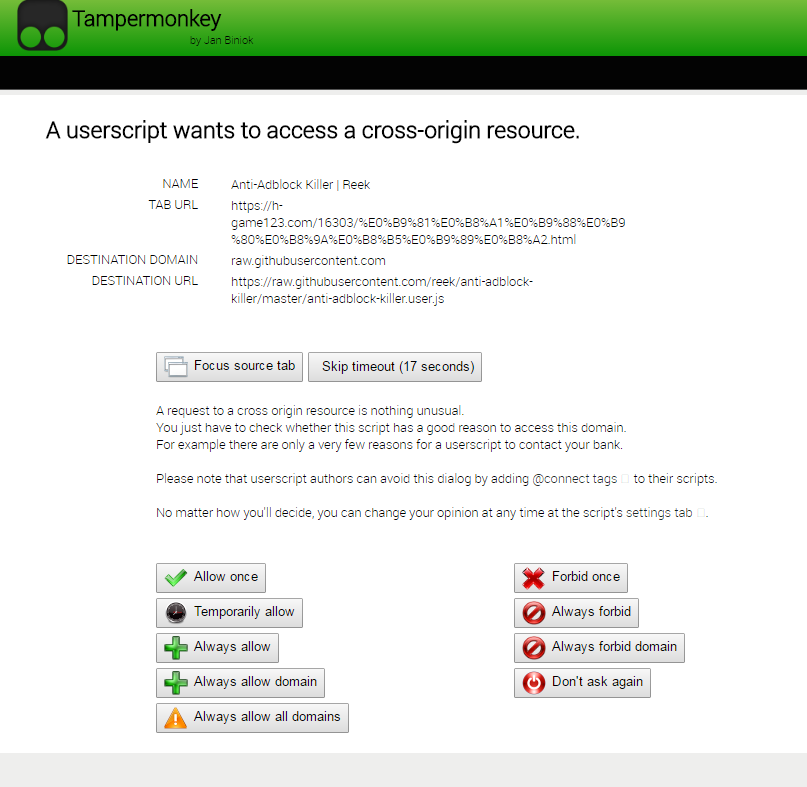
ต่อไปให้เราลองเข้าเว็บที่เราโดนหน้าจอกัน Ad-block อีกครั้งคราวนี้จะมีหน้าต่างของ Extension Tampermonkey ขึ้นมา

หน้าต่างนี้จะบอกว่า Script เราจะทำงาน เราจะสามารถเลือกจะให้ทำงานครั้งเดียว หรือจะให้ทำงานได้ตลอดก็ได้ครับ บางคนอาจจะซีเรียสเรื่องนี้ ก็สามารถเลือกให้ Allow เป็นบาง Domain ไป หรือถ้าจะไม่ให้เตือนอีก และให้ทำงานตลอดเลือก Always allow all domains เลยครับ

เท่านี้เราก็สามารถจัดการ Ad น่ารำคาญและ Ad ไม่พึงประสงค์ได้แล้วล่ะครับ

ท้ายที่สุดครับ อยากจะฝากไว้ครับ เว็บไซต์ทั้งหลายที่เปิดๆกันอยู่ล้วนมีค่าใช้จ่ายครับ บางทีหากเราไป Block โฆษณาทั้งหมดของทุกเว็บเลย อาจทำให้ Website ขาดรายได้และอาจต้องปิดตัวลงครับ ดังนั้นหากเว็บไซต์ไหนที่มี Ad แต่ไม่ได้น่ารำคาญขนาดนั้นแนะนำให้ปิดการ Block Ad ตามเว็บไซต์เหล่านั้นเพื่อช่วยทาง Website ให้อยู่รอดด้วยครับ จุดประสงค์ในบทความนี้ของผมต้องการจะ Block Ad ไม่พึงประสงค์และอันตรายจริงๆครับ ส่วนบทความหน้าผมจะมาแนะนำการ Block Ad แบบนี้ในโทรศัพท์ครับ แล้วพบกันใหม่ครับ

เล่นเกม แอป แอนดรอยด้วย Droid4X

สวัสดีครับ หายไปนาน กลับมาอีกครั้งกับบทความคุณภาพอีกเช่นเคย ช่วงนี้ผมติดเกมมากๆ โดยเฉพาะเกมในแอนดรอยเนี่ย ทำเสียเวลาในชีวิตไปเยอะ แต่โทรศัพท์แบทมันน้อยเหลือเกิ้น เล่นได้ไม่นานต้องชาร์ทอีกและ ทำให้ผมต้องสรรหาวิธีการที่จะทำให้เล่นเกมในแอนดรอยด้วยช่องทางอื่นนอกจากโทรศัพท์ครับ

ในระบบ Windows นั้นมีโปรแกรมที่ทำให้เราเล่นแอปแอนดรอยหลายเจ้าอยู่ โดยเฉพาะเจ้าใหญ่อย่าง Bluestack โหลดง่ายใช้งานง่าย แต่หลังๆมานี้ชักเริ่มมีการกั๊ก Spec โปรแกรมและให้ไปจ่ายเวอร์ชั่นเสียตัง ทำให้คนที่เล่นเกมโหดๆ อาจจะไม่สามารถเล่นใน Bluestack ได้บางเกม บังเอิญเพื่อนผมมันเล่นโปรแกรมตัวนึง ที่มันเหมือน Bluestack แถมเร็วกว่าเยอะมาก เล่นได้เกือบทุกเกม ผมจึงต้องโหลดมาลองบ้างแล้ว

และโปรแกรมที่พูดถึงก็คือโปรแกรม Droid4X ครับ เป็นโปรแกรมแอนดรอยที่ใช้ระบบเครื่องเสมือนอย่าง VirtualBox มาเป็นแกนในการขับเคลื่อน และโมดิฟาย Driver และ Config ทั้งหมดจนได้แอนดรอยที่เข้าที่เข้าทาง เล่นเกมไม่กระตุก และมีออพชั่นในการเล่นเกมครบครับเลยครับว่าแล้วมาโหลดเจ้า Droid4X กันเลยดีก่า

http://www.droid4x.com/

พอเข้าเว็บแล้วก็โหลดโปรแกรมติดตั้งมาลงได้ทันที แถมใช้ได้ทุก Windows ที่มีอยู่ตอนนี้ตั้งแต่ 7 8 10 ครับ หลังจากลงเสร็จก็สามารถเปิดใช้งานได้ทันที ถ้าใครเคยใช้แอนดรอยอยู่แล้วก็ไม่น่าจะมีปัญหาครับ

ส่วนที่บอกว่า Droid4X มีเครื่องมือช่วยเรื่องการเล่นเกมตามนี้เลยครับ

  1. อัด Video ระหว่างเล่นได้ ไม่ต้องลงอะไรเพิ่มเลยครับ กดรูปกล้องด้านล่างของเมนู ก็สามารถอัพได้ทันทีครับ
    cats
  2. Keyboard Controller อันนี้เจ๋งมากครับ สามารถตั้งค่าปุ่มคีบอร์ดกับจอแอนดรอยได้ทันที ทำให้เล่นเกมแนว Action ได้สบายๆไม่ต้องกดเม้า กิ้กๆๆ ตลอด
    2
  3. สามารถใช้ โทรศัพท์เรา เป็น Joy ได้ด้วย โดยโหลด App ของ Droid4x มาครับ ทำให้เรากดโทรศัพท์แทนได้เลย
    3
  4. บางเกมต้องเขย่าจอ ก็มีปุ่มให้เรากดแล้วเครื่องจะสั่นนิดนึงเหมือนเราเขย่า
  5. ปุ่ม Print Screen ไว้ Capture หน้าจอ
  6. สุดท้ายครับ Fake Location อันนี้สำหรับใช้หลอกตำแหน่งเครื่องครับ สำหรับคนที่เล่น Ingress สายบินน่าจะรู้ดี
    4

จะเห็นว่าเจ้า Droid4X นั้นตอบโจทย์สายเล่นเกมมากกว่า Bluestack ดังนั้นแนะนำให้ลองครับ แล้วแบทโทรศัพท์คุณจะเหลือมากขึ้น

ทำเว็บให้ปลอดภัยด้วย SSL แบบไม่เสียซักบาท

หายหน้าหายตาไปหลายเดือนเลยครับ ช่วงนี้ผมยุ่งกับงานมากๆ ต้องมาคอยดูแลงานก่อสร้างทั้งๆที่ตัวเองเป็นแค่ IT พูดแล้วมันก็เศร้าครับ แต่ความสนุกมันเพิ่มขึ้นเพราะการได้ลองซื้อ SSL มาเล่นซึ่งมันจะเพิ่มความปลอดภัยของเว็บไซต์ได้มากขึ้น รวมทั้งข้อมูลต่างๆที่ส่งผ่านระหว่างเครื่องลูก และเครื่องแม่จะถูกเข้ารหัสทั้งหมดครับ แถมได้ข่าวเมื่อไม่นานมานี้มา หลายๆ browser เริ่มจะพิจารณาเรื่องนี้อย่างจริงจัง อาจจะทำให้เว็บไซต์ที่ไม่ผ่าน SSL กลายเป็นเว็บไม่ปลอดภัยและมีการแจ้งเตือนตลอดครับ พูดแล้วเรามาเริ่มกันเลยดีกว่าครับ

SSL นั้นย่อมากจาก Secure Sockets layer เป็น Protocol หนึ่งที่ใช้กันอย่างแพร่หลายในเวลานี้ ประโยชน์ของมันเพื่อเข้ารหัสข้อมูลทั้งหมด ที่ส่งและรับจากเครื่องแม่ และเครื่องลูกครับ ทำไมต้องเข้ารหัส แน่นอนครับว่าทุกวันนี้ หลายๆคนอาจจะเล่นเน็ทตาม Wifi Free ต่างๆซึ่ง Network ของ Wifi ฟรีเหล่านี้เราไม่รู้เลยว่ามีการเก็บข้อมูลระหว่างทางของเราหรือเปล่า หรือไม่อาจจะมีมือดีแอบดักข้อมูลของเราอยู่ก็ได้ครับ หากเราไม่ได้เข้าเว็บที่ผ่านการเข้ารหัส เกิดมีการกระทำที่ว่ามาข้างตนอาจทำให้ข้อมูลของท่านรั่วไหลได้ครับ โดยปกติหากไม่เข้ารหัส ข้อมูลส่วนใหญ่จะถูกส่งเป็น plain text หาถูกดักข้อมูล เขาจะรู้ข้อมูลได้ทันที เช่นรหัสผ่าน ที่เข้าเว็บไซต์ต่างๆ ข้อมูล session ที่อาจจะค้างในเครื่องเพื่อใช้ยืนยันตัวตนกับเว็บไซต์ โดยไม่ต้องออกแรงอะไรเลย แต่ถ้าหากเข้ารหัสแล้วเขาสามารถดักข้อมูลเราไปได้จริง แต่เขาจะไม่สามารถรู้ได้เลยว่ามีข้อมูลอะไรอยู่เพราะมันถูกเข้ารหัสอยู่ ตัวอย่างเช่น เราส่งคำว่า AAAA ไปให้เครื่องแม่ หากไม่เข้ารหัส มันก็จะส่ง AAAA ไปเลย แต่ถ้าผ่านการเข้ารหัส มันจะกลายเป็นตัวหนังสือที่ไม่รู้เรื่องเช่น จาก AAAA อาจจะกลายเป็น xdfsa อะไรแบบนี้ครับ เข้าใจประโยชน์ของมันแล้ว คราวนี้เรามาเริ่มดูกันว่าจะไปหาใช้บริการเจ้าพวกนี้ได้ที่ไหน

SSL นั้นไม่ฟรีครับ ต้องเสียเงินซื้อ และการจะซื้อนั้นยังต้องมีการ Validation หรือยืนยันตัวตนกับผู้ที่ขายให้เราอีก โดยราคา SSL นั้นขึ้นอยู่กับประเภทครับ โดยแบ่งเป็นหัวข้อหลักๆเลยดังนี้

แบบที่ 1 DomainSSL เป็น SSL ที่เหมาะกับการทำเว็บไซต์ โดยราคาไม่แพงมาก และยืนยันตัวตัวง่ายๆ เพียงแค่เราเป็นเจ้าของโดเมน ก็สามารถยืนยันตัวตนได้แล้วครับ

cats

แบบที่ 2 OrganizationSSL เป็น SSL สำหรับองค์กร โดย SSL ประเภทนี้จะให้ความน่าเชื่อถือมากกว่าแบบแรก เพราะต้องใช้การยืนยันระดับองค์กร โดยผู้ที่จะซื้อต้องมีบริษัท และใช้เอกสารการจดบริษัทเพื่อยืนยันตัวตนครับ ราคานั้นอยู่ในระดับกลางๆ

cats

แบบที่ 3 ExtendedSSL เป็น SSL ขั้นสูงสุด โดย SSL แบบนี้เหมาะสำหรับองค์กรที่ต้องการความน่าเชื่อถือสูง เช่นธนาคาร ร้านค้า ห้างร้านใหญ่ๆ และจะเห็นได้ชัดที่สุดคือเมื่อเข้าเว็บไซต์แล้วจะมีแถบสีเขียว และแสดงบริษัทอย่างเห็นได้ชัด ส่วนราคานั้นค่อนข้างสูงครับ

2

นอกจาก 3 ประเภทนี้ยังมี Option ย่อยๆของแต่ละแบบด้วยครับ โดยแบ่งย่อยปรมาณนี้1. แบบ Standard แบบนี้รองรองแค่ชื่อโดเมนเดียวครับ เช่นจด kilvalrikan.com ก็สามารถใช้ได้แค่ชื่อนี้เท่านั้นครับ

2. แบบ Wildcard แบบนี้จะรองรับ Subdomain ด้วย เช่นจด kilvalrikan.com แล้วจะสามารถใช้ได้กับ mail.kilvalrikan.com sql.kilvalrikan.com ได้อีกครับ

3.แบบ UC (Unfield Communications) แบบนี้จะสามารถใช้ได้ หลายโดเมน และหลายซับโดเมนอีกด้วย แต่จะ Limit ให้ไม่เกิน 100 ชื่อครับ

สำหรับที่จัดจำหน่าย SSL เราสามารถซื้อเองจากผู้ให้บริการต่างชาติให้เลย หรือสามารถซื้อจากบริษัท Reseller ในไทย ที่จะให้คำแนะนำประเภท SSL ที่เหมาะสม และวิธีการติดตั้ง ใช้งานครับ อยากรู้ก็ลองค้นหาจากพี่กูเกิ้ลเลยครับ

ส่วนที่ผมจะมาแนะนำวันนี้เราจะมาใช้กันแบบฟรีๆครับ ซึ่งตอนนี้มีบริการแบบฟรีๆที่ผมรู้จักก็แค่เจ้าเดียวมั้ง ส่วนที่กำลังจะเปิดให้ใช้กันในเดือนกันยายน อย่าง let’s encrypt ก็ยังต้องรอ ใครใจร้อนมาใช้วิธีผมดีกว่า

ส่วนใหญ่เราเช่าโอสติ้งกัน น่าจะใช้ Directadmin เป็นหลัก งั้นผมจะสอนวิธีทำง่ายๆจาก directadmin ละกันครับ

เริ่มแรกให้เรา login เข้า directadmin ก่อนครับ จากนั้นให้กดปุ่ม domain administrator

1

หากใครไม่มีปุ่มนี้ลองติดต่อทางผู้ให้บริการว่าเราอยากใช้ SSL ให้เขาเปิดให้ละกันครับ

จากนั้นให้เรากดชื่อโดเมนที่เราจะทำครับ

2

ต่อไปให้เลือกตามภาพและครับ โดย Enable SSL และให้เว็บ ssl กับไม่ ssl อยู่ Folder เดียวกัน

3จากนั้นกด save และลองเข้าเว็บ โดยพิมพ์ https://ชื่อเว็บ ดูครับ หากใช้ได้จะเจอหน้าเตือนว่าการเข้ารหัสไม่ปลอดภัย

4ถ้าได้ถึงตรงนี้ถือว่าเสร็จสิ้นการตั้งค่า SSL ของ Hosting ต่อไปจะเป็นการไปทำใน Cloudflare ครับ โดยที่ Cloudflare เป็นบริการจัดการ Dns และช่วยเป็น cache ให้เพื่อเพิ่มความเร็วและลดภาระของ Server ซึ่งไม่นานมานี้เขาเปิดให้สามารถใช้ SSL ได้แบบฟรีๆ แต่ต้องผ่าน Cloudflare นะครับ ส่วนวิธีสมัคร และตั้งค่าโดเมนเข้ากับ Cloudflare นั้นผมว่าไม่น่ายากเกินกำลัง ผมขอข้ามไปเป็นวิธีการตั้งค่า SSL บน Cloudflare เลยละกันครับ

ขั้นแรกเลย โดเมนของท่านต้องผ่าน Cloudflare วิธีผ่านคือเข้าหน้า DNS และกฎเมฆให้มันเป็นสีส้มๆครับ โดบ Record ที่ต้องทำคือ A ชื่อเว็บเต็มๆของเรา กับ cname www ครับ ซึ่งถ้าเราตั้งค่าตอนแรกกับ Cloudflare เขาจะตั้งเป็น Default ให้อยู่แล้วครับ

6

ให้เราเข้าเมนู crypto ครับและเปิด SSL ให้เป็นแบบ Full

5พอเสร็จแล้วก็เซฟ จากนั้นรอซักแปปนึงแล้วดูผลที่ทำโดยการเข้าเว็บผ่าน https://เว็บไซต์ ดูครับถ้าไม่มี Warning เตือนแสดงว่าทำได้ถูกวิธีและครับทุกขั้นตอนครับ

เท่านี้เว็บเราก็จะปลอดภัยสำหรับผู้เข้าชม และตัว admin เองที่ต้องทำงานหลังเว็บบ่อยๆครับ หวังว่าบทความนี้จะเป็นประโยชน์สำหรับหลายคนนะครับ เพราะเป็นบทความในรอบ 2 – 3 เดือนของผม หุหุ เมื่อไหร่ที่ let’s encrypt มา ผมจะมารีวีวกันให้ทราบอีกครั้งครับ

ปล.พบคำผิด Comment แจ้งได้ครับ ผมรีบพิมพ์นิดนึง

ลง webui utorrent ใน CENTOS 6.5

วิธีการลง webui ใน centos 6.5 เห็นมีปัญหากันเยอะเรื่อง libssl
วิธีการทำข้างล่างนี้ก้อปปี้เขามา แต่แก้ไขเรื่อง libssl แล้ว สามารถใช้ได้เพราะทดสอบแล้ว หุหุ
ลองไปทำกันดูเด้อ

It has been six years since I migrated to Linux (from windows) and never looked back. I used to use uTorrent on windows as my torrent client. It was small, light-weight and very user friendly. Frankly speaking in these six years of my linux voyage, I never found any alternative to that. Until recently I heard that utorrent is now available for linux. Keeping my hopes high, I gave it a try and it lived up to my expectations. As expected it is free but closed-source, with a little hope from the forums that it might become open-source in the future. But anyways, I am really thankful to the utorrent team for briniging out utorrent for linux.

A couple of things felt missing but still it is  better than the most, infact all! It is currently an alpha release of version 3.0 build, with only web-based GUI and 32bit release (requires 32bit libraries on x64 systems).

Here is a complete step by step installation guide:

Step 0: Pre-Requisites

According to the website:

System Requirements:

  • x86 Ubuntu 9.10+, Debian 5+, Fedora 12+
  • Linux kernel 2.6.13 or newer required

utserver binary requires glibc-2.11 or newer. Do check this before continuing. To check your version of glibc:

rpm -q glibc

(Note: If you have old libraries, or facing any library related error, I have a different guide for you HERE )

I am using a 32 bit Centos 6.2, but this guide should work with most linux distributions. If you are using a x64 distribution, you’ll need to install all the 32 bit libraries.

In case of a 32 bit distro, there are hardly any dependencies to be installed. They are installed by default even in the minimal installations. Here is the list of dependencies anyway:

  • glibc >= 2.11
  • libgcc
  • openssl
  • krb5-libs
  • libcom_err
  • zlib
  • keyutils-libs
  • libselinux

If you are using a 32 bit distro:

yum install glibc libgcc openssl krb5-libs libcom_err zlib keyutils-libs libselinux openssl098e.i686

If you are using a 64bit distro, install the 32bit libraries:

yum install glibc glibc.i[36]86 libgcc libgcc.i[36]86 openssl openssl.i[36]86 krb5-libs krb5-libs.i[36]86 libcom_err libcom_err.i[36]86 zlib zlib.i[36]86 keyutils-libs keyutils-libs.i[36]86 libselinux libselinux.i[36]86 openssl098e.i686

Step 1: Make basic directories

I will keep it in /opt (ofcourse you can keep it anywhere feasible)

mkdir /opt/utorrent
mkdir /opt/utorrent/conf
mkdir /opt/utorrent/data
mkdir /opt/utorrent/pid
mkdir /opt/utorrent/webui
mkdir /opt/utorrent/log

Step 2: Download µTorrent Server

At the time of this writing, µTorrent Server alpha (3.0 build 25053) was the latest available one. You can find the latest release here. Download the package to a tmp location, extract and then copy the required files:

wget -O /tmp/utorrent-server-3.0-25053.tar.gz http://download.utorrent.com/linux/utorrent-server-3.0-25053.tar.gz
tar –directory /tmp -xzf /tmp/utorrent-server-3.0-25053.tar.gz

cp /tmp/utorrent-server-v3_0/utserver /opt/utorrent/

cp /tmp/utorrent-server-v3_0/webui.zip /opt/utorrent/webui/

Step 3: Libraries check

Before proceeding further, it will be a good idea to locate any missing libraries.
Use ldd command to find out any missing library:

ldd -r /opt/utorrent/utserver

You might get the following error:

/opt/utorrent/utserver: error while loading shared libraries: libssl.so.0.9.8: cannot open shared object file: No such file or directory

or

/opt/utorrent/utserver: error while loading shared libraries: libcrypto.so.0.9.8: cannot open shared object file: No such file or directory

If openssl is installed properly, this might be because you have a newer version of the shared library. Creating a softlink should solve the problem.

First find out what version you have:

find  /*/lib /*lib  -type f -name “libssl.so.*”

find  /*/lib /*lib  -type f -name “libcrypto.so.*”

This will show you the library you have installed, for example in my case it showed me that I’ve libssl.so.1.0.0 and libcrypto.so.1.0.0 installed:

[root@localhost ~]# find  /*/lib /*lib  -type f -name “libssl.so.*”
/usr/lib/libssl.so.0.9.8e

[root@localhost ~]# find  /*/lib /*lib  -type f -name “libcrypto.so.*”
/usr/lib/libcrypto.so.0.9.8e

Now simply create a soft link from the one you have to the one required by utserver:

ln -s /usr/lib/libssl.so.0.9.8e /usr/lib/libssl.so.0.9.8

ln -s /usr/lib/libcrypto.so.0.9.8e /usr/lib/libcrypto.so.0.9.8

(ofcourse you can always install the correct version of openssl instead of doing this softlink trick)

If every thing is fine you should get output some what like this:

[root@his apps]$ ldd -r /opt/utorrent/utserver
/opt/utorrent/utserver: /usr/lib/libcrypto.so.0.9.8: no version information available (required by /opt/utorrent/utserver)
/opt/utorrent/utserver: /usr/lib/libssl.so.0.9.8: no version information available (required by /opt/utorrent/utserver)
linux-gate.so.1 =>  (0x0042c000)
libssl.so.0.9.8 => /usr/lib/libssl.so.0.9.8 (0x00cb8000)
libcrypto.so.0.9.8 => /usr/lib/libcrypto.so.0.9.8 (0x009dc000)
libpthread.so.0 => /lib/libpthread.so.0 (0x00110000)
libm.so.6 => /lib/libm.so.6 (0x00800000)
librt.so.1 => /lib/librt.so.1 (0x001a2000)
libgcc_s.so.1 => /lib/libgcc_s.so.1 (0x00465000)
libc.so.6 => /lib/libc.so.6 (0x001ab000)
/lib/ld-linux.so.2 (0x005a8000)
libgssapi_krb5.so.2 => /lib/libgssapi_krb5.so.2 (0x00c25000)
libkrb5.so.3 => /lib/libkrb5.so.3 (0x0033b000)
libcom_err.so.2 => /lib/libcom_err.so.2 (0x0012b000)
libk5crypto.so.3 => /lib/libk5crypto.so.3 (0x00622000)
libresolv.so.2 => /lib/libresolv.so.2 (0x00130000)
libdl.so.2 => /lib/libdl.so.2 (0x0045b000)
libz.so.1 => /lib/libz.so.1 (0x00767000)
libkrb5support.so.0 => /lib/libkrb5support.so.0 (0x004be000)
libkeyutils.so.1 => /lib/libkeyutils.so.1 (0x00991000)
libselinux.so.1 => /lib/libselinux.so.1 (0x0014a000)

(You can ignore the “no version information” warning). This shows every requirement is fulfilled and utorrent server can now run on this machine. Lets now do some final config tweaks.

Step 4: Create config file

In theory you can just run the utserver binary (like you did in the previous step), and utorrent server should be ready and useable. You don’t necessarily need a config file But it is always a good idea to have a config file in hand, it’ll make editing and experimenting with the configurations much easier and give you a lot more options to play with.

I wasn’t able to find a complete and comprehensive config file. Users are either not using config file or using it just for a couple of options.
I’ve created this config file from the documentation and added all the options I found. All the directives are explained in the comments and set to the default value.

Here it is (only dir_root is set to /opt/utorrent/data all other values are default):

###########################################
###                                     ###
### Utorrent Server v3.0 Config File    ###
###                                     ###
### By Khizer Naeem                     ###
### [email protected]               ###
### Date: 29/12/2011                    ###
###                                     ###
###########################################
###########################################
# Note: – Don’t use quotes or double quotes when giving a value
#       – Don’t add trailing / when specifying any directory

#####################
## Regular Settings #
#####################

#bind_port (integer):
#    Default value: 6881. Port used for BitTorrent protocol. This can be any value in the range 1025-65000.
bind_port: 6881

#max_ul_rate (integer):
#    Default value: -1. Maximum total upload rate in kilobytes per second. -1 means unlimited. We recommend setting it to -1.
max_ul_rate: -1

#max_ul_rate_seed (integer):
#    Default value: -1. Maximum per-torrent upload rate when seeding, in kilobytes per second. -1 means unlimited. We recommend setting it to -1.
max_ul_rate_seed: -1

#conns_per_torrent (integer):
#    Default value: 50. Maximum number of connections for a given torrent.
conns_per_torrent: 50

#max_total_connections (integer):
#    Default value: 200. Maximum number of connection opened at the same time.
max_total_connections: 200

#auto_bandwidth_management (boolean):
#    Default value: true. If true, upload bandwidth is automatically throttled in order to not impact other applications using TCP/IP.
auto_bandwidth_management: true

#max_dl_rate (integer):
#    Default value: -1. Maximum total download rate in kilobytes per second. -1 means unlimited. We recommend setting it to -1.
max_dl_rate: -1

#seed_ratio (integer):
#    Default value: 0. Seed ratio in percent (%) (e.g. 100 means 100%). If not 0, seeding will stop after reaching this upload/download ratio.
seed_ratio: 0

#seed_time (integer):
#    Default value: 0. Time after which seeding will stop, in seconds. 0 means seeding won’t stop.
seed_time: 0

#####################
# Internal Settings #
#####################

#bind_ip (string):
# IP address to use for socket connections. If not provided, a default IP address will be used. We do not recommend changing this value.

#ut_webui_port (integer):
# Default value: 8080. Port number where the utserver process accepts HTTP RPC API calls to support the µTorrent-compatible HTTP interface.
ut_webui_port: 8080

#token_auth_enable (boolean)
# Default value: true. If true, the µTorrent HTTP interface defends against cross-site request forgeries.
# If false, the µTorrent HTTP interface will not be protected in this manner.
token_auth_enable: true

#dir_root (string):
# Default value: “”. If not empty, dir_active, dir_completed, and dir_torrent_files are relative to this directory.
dir_root:/opt/utorrent/data

#dir_active (string):
# Default value: “./”. Directory in which currently downloaded data is saved.
# Can be an absolute path or relative to dir_root or the current working directory if dir_root is not defined or an empty string.
#dir_active: ./

#dir_completed (string):
# Default value: “”. Directory where completed downloads are stored.
dir_completed:

#dir_download (string):
# Default value: “”. Optional directory where completed downloads can be stored, instead of in dir_completed.
# If no value is specified for this setting, the value of dir_completed is used.
# This option can be specified multiple times in the file – once for each directory to be designated as such.
# This option can be used when adding torrents via the µTorrent HTTP interface, not via the SDK interface.
# Use the action list-dirs to obtain a list of download directories from the µTorrent HTTP interface.
# Use the option download_dir to specify which of these directories to use when adding a torrent by URL or file through the µTorrent HTTP interface;
# The index of each entry will be in order in which each entry appears in utserver.conf
dir_download:

#dir_torrent_files (string):
# Default value: “”. Directory where torrent files are stored. If the empty string, the value of dir_active is used.
dir_torrent_files:

#dir_temp_files (string):
# Default value: “”. Directory where temporary files are stored. If the empty string, the value of dir_active is used.
# Using a separate directory just for temporary files allows for deleting the files in this directory on boot and/or periodically.
# The utserver process creates temporary files with a .utt extension,
# if a value for this setting is specified, the utserver process will delete all files with that extension in that directory at process startup.
# The value should specify a directory, not a symbolic link to a directory.
dir_temp_files:

#dir_autoload (string):
# Default value: “”. Directory where torrent files will be recognized and auto-loaded. If the empty string, auto-load is disabled.
dir_autoload:

#dir_autoload_delete (boolean):
# Default value: false. If true, torrent files in the autoload directory will be deleted after being loaded,
# else they will be renamed with an extension of .loaded. The dir_autoload setting must be specified for this setting to have an effect.
dir_autoload_delete: false

#upnp (boolean):
# Default value: true. If true, UPNP functionality for mapping ports is used by utserver. We recommend setting this value to true.
upnp: true

#natpmp (boolean):
# Default value: true. If true, NAT-PMP functionality for mapping ports is used by utserver. We recommend setting this value to true.
natpmp: true

#lsd (boolean):
#    Default value: true. If true, Local Service Discovery is enabled. We recommend setting this value to true.
lsd: true

#dht (boolean):
# Default value: true. If true, Distributed Hash Table extension is enabled. We recommend setting this value to true.
dht: true

#pex (boolean):
# Default value: true. If true, Peer Exchange extension is enabled. We recommend setting this value to true.
pex: true

#rate_limit_local_peers (boolean):
# Default value: false. If true, rate limiting also applies to communications with peers in the local subnet. We recommend setting this value to false.
rate_limit_local_peers: false

#disk_cache_max_size (integer):
# Default value: 0. Maximum amount of memory used by each of the read, write, and piece caches. Value is in megabytes.
# If 0, accepts the SDK’s default choices on selecting sizes of disk caches. Maximum value is 512.
disk_cache_max_size: 0

#preferred_interface (string):
# Default value: “”. If defined, name of network interface to be preferred,
# when attempting to search among network interfaces for an external IP and hardware address.
# If empty string, preferred interface is ignored.
preferred_interface:

#admin_name (string):
# Default value: “admin”. If defined, name that must be supplied (along with the password) when authenticating to the server via the HTTP interface.
# This allows the administrator to define an initial non-default value for this name.
# This value will not be applied from utserver.conf if settings.dat already exists.
admin_name: admin

#admin_password (string):
# Default value: “”. If defined, password that must be supplied (along with the name) when authenticating to the server via the HTTP interface.
# This allows the administrator to define an initial non-default value for this password.
# This value will not be applied from utserver.conf if settings.dat already exists.
admin_password:

#logmask (integer):
# Default value: 0. A mask whose bits when set allow certain categories of log messages to be generated.
# The bits (0 – 31) in the value of this setting correspond to a set of internal events and subsystems.
#
#        3 – send have
#        6 – hole punch
#        7 – got bad piece request
#        8 – trace
#        9 – piece picker
#        10 – got bad cancel
#        11 – got bad unchoke
#        12 – got bad piece
#        13 – rss
#        14 – rss error
#        15 – got have
#        16 – got bad have
#        17 – error
#        18 – aggregated
#        19 – disconnect
#        20 – out connect
#        21 – in connect
#        22 – UPnP
#        23 – UPnP error
#        24 – NATPMP
#        25 – NATPMP error
#        26 – metadata finish
#        27 – web UI
#        28 – got bad reject
#        29 – pex
#        30 – peer messages
#        31 – blocked connect
logmask: 0

#dir_request (string):
# Default value: “”. Directory where maintenance request files will be recognized, loaded, and deleted.
# If the empty string, maintenance request handling is disabled.
#
# Your software running on your device can create the following files in this directory in order to request the following maintenance procedures.
#
#    If the file c.utmr is created in or moved into this directory,
#    the credentials necessary to access the µTorrent HTTP interface will be reset to username admin and a blank password.
#
#    If the file wipl.utmr is created in or moved into this directory,
#    the IP restriction list that limits the IPs that can use the µTorrent HTTP interface is cleared,
#    so that there will be no restrictions on IP address.
#
#    If the file rcf.utmr is created in or moved into this directory,
#    the server will reload the configuration file. If you always use this method to request a configuration file reload,
#    you can safely change the value of this setting while the server is running.

#ut_webui_dir (string):
# Default value: “”. Directory where the web UI file archive webui.zip is stored,
# or which contains a webui subdirectory within which the unarchived web UI files are stored.
# It can be an absolute path or set relative to the current directory.
ut_webui_dir:

#finish_cmd (string), state_cmd (string):
# Default value: “”. If defined,
# finish_cmd is a command that will be executed upon completion of each torrent.
# state_cmd is a command that will be executed when a torrent changes state.
# The command is run asynchronously as the same user that runs the server process.
#
#    The server permits substitutions in the command text as follows:
#
#    %F Name of downloaded data file (for single-file torrents)
#    %D directory where torrent data files are saved
#    %N torrent title
#    %S torrent state
#    %P previous state of torrent
#    %L label associated with torrent
#    %T tracker
#    %M status message
#    %I hex-encoded info-hash
#
#    State (%S) and previous state (%P) are integers that have the following values:
#
#    1 (error)
#    2 (checked)
#    3 (paused)
#    4 (super seeding)
#    5 (seeding)
#    6 (downloading)
#    7 (super seeding (forced))
#    8 (seeding (forced))
#    9 (downloading (forced))
#    10 (queued seed)
#    11 (finished)
#    12 (queued)
#    13 (stopped)
finish_cmd:
state_cmd:

Don’t worry most of the lines in the config are comments (only 34 directives in total). I recommend going through it once.

Copy-Paste this configuration into the file utserver.conf in /opt/utorrent/conf/ directory using your favourite text editor like vim or download it directly:

wget -O /opt/utorrent/conf/utserver.conf http://kxr.me/blog/uts/utserver.conf

Now you can start the utorrent server with the following command:

/opt/utorrent/utserver -settingspath “/opt/utorrent/webui/” -configfile “/opt/utorrent/conf/utserver.conf” -logfile “/opt/utorrent/log/ut.log” -pidfile “/opt/utorrent/pid/utserver.pid” -daemon

and stop it with:

 kill `cat /opt/utorrent/pid/utserver.pid`

That is not very convenient, so lets create a script to make things easier.

 #!/bin/sh

uts_bin=”/opt/utorrent/utserver”
pid_file=”/opt/utorrent/pid/utserver.pid”
settings_path=”/opt/utorrent/webui/”
config_file=”/opt/utorrent/conf/utserver.conf”
log_file=”/opt/utorrent/log/ut.log”

start(){

if [ -s “$pid_file” ]
then
kill -s 0 `cat $pid_file` > /dev/null 2>&1
if  [ “$?” == “0” ]
then
echo “Err: Utorrent seems to be running, PID `cat $pid_file`”
else
echo “Starting Utorrent Server..”
cd $settings_path;$uts_bin -settingspath $settings_path -configfile $config_file -logfile $log_file -pidfile $pid_file -daemon
fi
else
echo “Starting Utorrent Server..”
cd $settings_path;$uts_bin -settingspath $settings_path -configfile $config_file -logfile $log_file -pidfile $pid_file -daemon
fi
}
stop(){
if [ -s “$pid_file” ]
then
kill -s 0 `cat $pid_file` > /dev/null 2>&1
if  [ “$?” == “0” ]
then
echo “Stopping Utorrent Server..”
kill `cat $pid_file`
tail -f /dev/null –pid `cat $pid_file`
rm -f $pid_file
else
echo “Err: Utorrent seems to be stopped, PID file $pid_file not found or empty”
fi
else
echo “Err: Utorrent seems to be stopped, PID file $pid_file not found or empty”
fi
}
status(){
if [ -s “$pid_file” ]
then
kill -s 0 `cat $pid_file` > /dev/null 2>&1
if  [ “$?” == “0” ]
then
echo “Utorrent seems to be running, PID `cat $pid_file`”
else
echo “PID file present, but no process with PID `cat $pid_file` running”
fi
else
echo “Utorrent seems to be stopped, PID file $pid_file not found or empty”
fi
}

case “$1” in
start)
start
;;
stop)
stop
;;
reload)
stop
rm -vf $settings_path/settings.dat*
start
;;
status)
status
;;
*)
echo “Usage $0 {start|stop|reload|status}”
;;
esac

Create a file called utsctl in /opt/utorrent and copy-paste the code into it using your favourite editor or download it directly:

wget -O /opt/utorrent/utsctl http://kxr.me/blog/uts/utsctl

Once you have created this script file, lets make it executeable:

chmod +x /opt/utorrent/utsctl

And also make it easily accessible, so that we don’t have to type the whole path again and again:

ln -s /opt/utorrent/utsctl /usr/bin/utsctl

Now starting stoping and checking the status is as easy as this:

utsctl start

utsctl stop

utsctl status

Step 5: Start µTorrent Server

Lets now start the utorrent server:

utsctl start

It should output “server started – using locale en_US.UTF-8” and return back to bash prompt. (Optionally, you can add this command to rc.local to auto-start it at startup)

You should now be able to access the utorrent server gui on localhost:

http://localhost:8080/gui

or via the ipaddress/hostname if accessing from a remote computer:

http://1.2.3.4:8080/gui

(don’t forget to allow this port in the system’s iptable firewall and any other firewall in between)

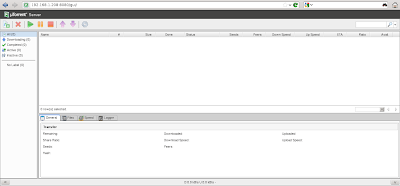
Here is a screen-shot:

Playing with the configuration:

When you change a configuration in utserver.conf, just restarting the utserver daemon won’t update the changes in WebUI. You’ll have to remove the settings.dat files and then start the server again i.e,

utsctl stop
rm -f /opt/utorrent/webui/settings.dat*
utsctl start

I’ve added the “reload” option in the utsctl script that will do all these three things:

utsctl reload

Good Luck 🙂

Source : http://blog.kxr.me/2011/12/utorrent-server-on-linux-step-by-step.html

Modify : kilvalrikan.com

แก้ปัญญา เปิด PC Setting เปิดไม่ขึ้น ใน Windows 8

1. Double check to make sure that access to PC settings has not been disabled.

2. Press the Windows + R keys to open the Run dialog, copy and paste the path below into Run, and click/tap on OK.

%ProgramData%\Microsoft\Windows\Start Menu\Programs

3. Check to see if you have the PC settings (aka: Immersive Control Panel) shortcut. (see screenshot below)

Click image for larger version

4. Do step 5 or 6 below depending on if you already have the PC settings shortcut.

5. If you do have the PC settings shortcut, then go to step 7 below.

6. If you do not have the PC settings shortcut, then click/tap on the download button below to download thePC_settings.zip file below for a clean copy.

download

A) Save the .zip file to your desktop.

B) Open the .zip file, extract (drag and drop) the Immersive Control Panel (aka: PC settings) shortcut to your desktop.

C) Move the Immersive Control Panel (aka: PC settings) shortcut into the Programs folder in step 2. (see screenshot below step 3)

D) If prompted, click/tap on Yes, Yes, Continue (UAC), Yes, and Yes to approve. (see screenshots below)

Name:  Approve.png
Views: 41922
Size:  20.6 KB

Name:  Conitnue.png
Views: 41794
Size:  27.0 KB

E) Test to see if you are able to open PC settings now.

F) If you are still not able to open PC settings, then go to step 7 below.

G) If you are able to open PC settings now, then you’re finished and can stop.

7. Open an elevated command prompt.

A) In the elevated command prompt, copy and paste the command below, and press Enter. (see screenshot below)


Code:
powershell -ExecutionPolicy Unrestricted Add-AppxPackage -DisableDevelopmentMode -Register $Env:SystemRoot\ImmersiveControlPanel\AppxManifest.xml
Click image for larger version


Note   Note
If you get the 0x8007064A error in quotes below, then it means that the Packages registry key below does not have System set as it’s owner. For how, see step 3 in Option Three here: How to “Take Ownership” of a File, Folder, Drive, or Registry Key in Windows 8 and 8.1. Afterwards, try again.

Code:
HKEY_CURRENT_USER\Software\Classes\Local Settings\Software\Microsoft\Windows\CurrentVersion\AppModel\Repository\Packages

error 0x8007064A: Cannot register the request because the following error wasencountered while initializing the windows.repositoryExtension extension: The
configuration data for this product is corrupt. Contact your support personnel.

8. Test to see if you are able to open PC settings now.

9. If you are still not able to open PC settings, then see: Fix Store Apps and Tiles that are Not Working or Responding in Windows 8 and 8.

Source : http://www.eightforums.com/tutorials/42001-pc-settings-fix-restore-windows-8-1-a.html

กันลืม Virtual link Folder for Windows

Try the following:

Open a command prompt with administrative permissions:

mklink /D Virtual_Folder_Here Real_Folder_Here

Example, you want to install something to D:\Games, but you want it to appear as C:\Games.

mklink /D C:\Games D:\Games

This will create a folder D:\Game which also appears as C:\Game. Anything that references C:\Game will be redirected to D:\Game.

Since I am not completely familiar with steam, I have not given an example that matches your exact folder. If steam allows you to pick the folder it installs to (Which due to you not just installing it to the other drive, I am not so sure it does.) you could create they symbolic link first. If however it does not, you may need to do some file-transfers, moving it to the new location and then creating the symbolic link. Example:

Steam installed your game to: C:\Program Files\Steam\SteamApps\common\Game2

Now, you create your folder: D:\GameGoesHere

Then, you copy all the files from the original folder and put it in D:\GameGoesHere, then you can create the link:

mklink /D “C:\Program Files\Steam\SteamApps\common\Game2” “D:\GameGoesHere”

Notice I used quotations this time due to the spacing of “Program Files.” Also note that before creating the link the virtual folder must NOT be a real folder. So, if the folder you want to be a link exists, you must delete it first (Not before you copy it, of course!)

วิธีแก้ไขลูกกลิ้งเม้าส์รุ่นเก่าของแอปเปิ้ล

หาวิธีทำให้ลูกกลิ้งเม้าส์แอปเปิ้ลรุ่นเก่าใช้ได้และ แต่เป็นภาษาอังกฤษวะ

I love the scroll wheel on top of the Apple mighty mouse, but after use the sweat and oil on your finger combined with grit and dust clogs the whole thing up. This manifests itself in the scroll wheel not scrolling down, or up, or in worst cases, not scrolling all. Here’s how to fix the problem.

I rang Apple and said my scroll wheel was not working and they gave me this simple but effective solution over the phone. It was not broken but just dirty. It’s funny that I could not find it anywhere on Google or on the Apple webpage, it has worked for me numerous times.

Simply take a sheet of clean white paper, put it on top of the mouse, and press down on the scroll wheel with your finger, but with the paper between your finger and the scroll wheel. Press quite hard with it and at the same time scroll around – moving it up and down and round and round. Move to a different area of the paper and give it another go.

The paper seems to absorb all the oil and gunk off the scroll wheel, and the scroll wheel in turn when it is clean must absorb the gunk off the sensors or whatever is underneath it.

จับใจความง่ายๆคือ หากระดาษทิชชู่ มาถูแรงๆที่ เม็ดกลิ้ง วนไปมาจรรอบๆ แล้วลองกลิ้งดูถ้าไม่ดีขึ้นก้ทำไปเรื่อยๆ ซัก 2-3 ที ก็จะใช้ได้ปกติ เหอๆ

Source : http://macintoshhowto.com/hardware/how-to-fix-the-scroll-wheel-on-your-apple-mighty-mouse.html

Socks5 แบบใช้ PAM (Debain 7 & ubuntu 12.04)

What should be done:

  1. Install Dante server and PAM library
  2. Edit Dante configuration file “/etc/danted.conf”
  3. Add PAM configuration file
  4. Create user accounts
  5. Start the server and check settings
  6. Troubleshoot

1. Install Dante server and PAM library

I wanted to restrict access to my SOCKS server but didn’t want to add local users and authenticate against them. Also IP based restriction was out of the question as our users IP is dynamic. A PAM (Pluggable Authentication Module) library would be ideal for that regard. To install, run the following command:

2. Edit Dante configuration file

Back up the original configuration file

Open vim or your favorite text editor

Copy and paste following lines. Its very simple configuration that allows every client with an account to access the server so you may want to edit this so it fits your needs.

You can read more about Dante server configuration here.

3. Add PAM configuration file

When I installed Dante, it didn’t create any file in “/etc/pam.d” folder but if there is any, we need to make a back up.

and create a new file

Copy and paste following lines and save the file

4. Create user accounts

I used htpasswd to register users so I assumed that you have apache2 installed on your server. We have to create a folder to put our virtual accounts database there.

then use following command to register users

if cannot find htpasswd command user this command “sudo apt-get install apache2-utils

The command will ask you for a password. Minor problem with htpasswd command is that your passwords can not be larger than 8 characters.

-c argument will make new file and -d will force MD5. For creating additional users you only need to use -d argument.

5. Starting server

To start the server enter following command

To stop the server

If you’re lucky enough your server will start without any problems. If not please refer to troubleshooting step.

To test your server you need a SOCKS 5 client that could handle authentication. I don’t know about linux but you can use Proxifier if you’re using windows.

6. Troubleshooting

The only problem I encountered while setting up the server was getting following error after started the server:

After a bit of digging I found out that this is a bug exist in Ubuntu 12.04. Anyway you can solve the problem with below command

Hope this helps some people who had trouble setting up Dante server.

Source http://devmash.net/setup-dante-server-with-virtual-user-accounts-on-ubuntu/
and http://www.linuxquestions.org/questions/linux-networking-3/unable-to-find-htpasswd-command-932076/

ทำ socks 5 ให้กับ debian server

How to install dante socks server on debian (ubuntu is similar):

apt-get install dante-server

This installs dante onto your debian server. By default it will not start (it will try to start – but will fail saying “no internal interfaces are configured etc…”).

To configure Dante socks server:

vi /etc/danted.conf

By default – most required lines will be uncommented. The following lines need to be inserted/ uncommented in danted.conf

#logoutput: stderr
logoutput: syslog
#the above line will send any logs to /var/log/syslog instead to a terminal

internal: eth0 port = 1080
internal: 127.0.0.1 port = 1080

external: eth0

method: username none
#the above puts no username or password. Access will instead be controlled via client ip address/range.
#if there is no username or password - then danted socks server needs to run as nobody, i.e.

#method: pam
# if you choose to use pam instead - a valid username&password as required for sshing to the socks server is required.
#Note: not sure if proxy login details are sent in clear text.

#user.privileged: proxy
user.notprivileged: nobody

client pass {
        from: 136.201.251.21/0 port 1-65535 to: 0.0.0.0/0
        # 136.201.251.21/0 = specific ip address.
} 

client pass {
        from: 127.0.0.0/8 port 1-65535 to: 0.0.0.0/0
}

client block {
        from: 0.0.0.0/0 to: 0.0.0.0/0
        log: connect error
}

#Finally block other traffic
block {
  from: 0.0.0.0/0 to: 127.0.0.0/8
  log: connect error
}

pass {
  from: 136.201.251.21/0 to: 0.0.0.0/0
  protocol: tcp udp
}

pass {
  from: 127.0.0.0/8 to: 0.0.0.0/0
  protocol: tcp udp
}

block {
  from: 0.0.0.0/0 to: 0.0.0.0/0
  log: connect error
}

Once the config is complete. Start/Restart dante socks server:

/etc/init.d/danted start

If there is a problem with the config – it will tell you immediately on trying to start the danted daemon.

Test Dante Socks Server

netstat -n -a
#check to see if server is listening on 1080

Make sure the firewall is open. Add appropriate rule as on Iptables_Firewall. Test also with winscp or putty.

Other SOCKS Servers

Note that putty itself can provide a SOCKS 5 server!! (But putty needs to be able to connect to an external server/computer firstly!)

To configure socks to act as a socks v5 server:

Open Putty, Go to CONNECTION -> SSH -> TUNNELS
In the Source Port - put 1080
In the Destination Port - put 1080
Click on the Dynamic radio button for "Dynamic Port Forwarding"

Connect to an server with external access. Telnet localhost 1080 and it should connect.

Also note – SOCKS v5 can be setup using ssh on the command line.

ssh [email protected] -D 1080
# -D is for Dynamic Port Forwarding.

Copy มาจาก http://wiki.kartbuilding.net/index.php/Dante_Socks_Server#Test_Dante_Socks_Server

ส่วนวิธีการทำให้ authen ได้

Overview

The username authentication method uses the system password file to verify a username and password combination supplied by a user as part of the SOCKS version 5 authentication process. Note that the password is transmitted in cleartext with this authentication method.

Environment setup

The standard system password authentication functions are used to verify the password, and the machine running the SOCKS server needs to have all users and passwords in a password file or similar database. It might, depending on the platform, be possible to run the server in a chroot() environment with a password file independent of the rest of the system.

Server privileges

#server identities (not needed on solaris)
user.privileged    : root
user.notprivileged : socks

For the server to be able to access the system password file, it will typically have to be started with root privileges. In this case, the user.privileged anduser.notprivileged keywords should be set to ensure that the server will run as an unprivileged user when it does not need root privileges.

Example clientmethod usage

This authentication method cannot be used as a clientmethod.

Example method usage

#authentication methods
method: username
#generic pass statement - bind/outgoing traffic
pass {  
        from: 0.0.0.0/0 to: 0.0.0.0/0
        command: bind connect udpassociate
        log: error # connect disconnect iooperation
        method: username
}

The authentication configuration template can be used directly for outgoing traffic, it is only necessary to specify the method name.

The username method cannot be used for incoming traffic (bindreply, udpreply).

Copy มาจาก http://www.inet.no/dante/doc/1.3.x/config/auth_username.html

ว่ากันด้วยเรื่อง Harddisk Server

วันนี้เหนื่อยนิดหน่อยครับกับงานที่บริษัท เหนื่อยพระเจ้า Harddisk ของเครื่อง Server มันดันไฟแดงพร้อมกันหลายลูก ลำพังส่วนตัวแล้วมันก็เป็นเรื่องน่าจะตื่นเต้นนิดหน่อย แต่ก็สามารถแก้ง่ายๆด้วยการซื้อ Harddisk ใหม่มาเปลี่ยน

แน่นอนครับ อะไหล่ของ Server เมื่อเครื่องเราเริ่มเก่า (ใช้มามากกว่า 3 ปี) ส่วนใหญ่เขาไม่ค่อยเก็บอะไหล่เก่าๆเอาไว้ ถ้าจะซื้อต้องสั่ง By order ซึ่งระยะเวลากว่าจะได้ Harddisk ถือว่านานเลยทีเดียว ประมาณ 30-60 วันแล้วแต่กำลังภายในของแต่ละบริษัทว่าจะสามารถหาของมาให้กับลูกค้าได้เร็วมากน้อยขนาดไหน

แต่เจ้านายผมเขาวัยรุ่นครับ HDD ถ้าซื้อแล้วต้องรอขนาดนี้ ซื้อเครื่องใหม่เลยไม่ดีกว่าหรือไง อืม ผมก็ไม่ได้คิดแบบนั้นหรอกครับ แต่เมื่อเจ้านายเขาต้องการ ลูกน้องอย่างเราก็ต้องสนอง ส่วน Spec ใหม่งั้นหรอ จัดเต็มสิครับ HDD 600 GB 8 ลูก กับเครื่องใหม่สุด DL380 G8 พร้อมแรม 32 GB แหม่ กับเปลี่ยน HDD 2 ลูก ล่อซื้อเครื่องใหม่ 2 แสนกว่าบาท แต่ช่างเขาเหอะครับ เงินเขา แถมเราได้เล่นของใหม่ อิอิ

หลังจากตกลงราคาอะไรกันเรียบร้อยแล้ว เจ้านายอนุมัติ ก็จัดสิครับ หึหึ แต่ดั้น มีปัญหาอีก ปัญที่นี่ไม่ใช่อยู่ที่เจ้านาย หรือลูกน้องอย่างพวกผมอ่ะสิ แต่ปัญามันอยู่ที่ ผจก หัว Conservative สุดโต่ง แสรดดดด ตั้งคำถาม ต่างๆนานา ประมาณว่า HDD เก่าเสียจริงอ่ะเปล่า แล้วมันเสีย 2 ตัวใช้ Raid 5 เนี่ย มันไม่มีปัญหาหรอ พี่ไปดูในเว็บ เขาบอกว่ามันพังนะไฟล์หายหมด (คือมึงจะแช่งเครื่อง Server ให้ข้อมูลหายทำส้นตีนอะไรฟะ เดี๋ยวงานเข้าหมด) แถม ยังจุ้นจ้านกับความ Want สุดๆของเจ้านาย ว่าซื้อทำไม HDD 8 ตัว กับแรม ใส่ทำไม 32 GB คือแม่งโคตรอยากจะถามเลยว่าเงินมึงหรือฟะ แสรดด เจ็ดเป็ด แม่เจ็ด นี่แต่ไม่เป็นไรครับ ทุกคำถามเรามีคำตอบเสมอ

เข้าเรื่องความรู้กันบ้างดีกว่าครับ บ่นมาพักหนึ่งแล้ว

ปกติ คอมพิวเตอร์แต่ละคนใช้ HDD กัน 1 ลูกใช่ไหมครับ ส่วนใหญ่น่าจะแบบนั้นนะครับ แต่เมื่อเราต้องให้ความสำคัญกับข้อมูลในเครื่องเรามากๆ เช่นเป็นข้อมูลลูกค้า ข้อมูลเอกสารสำคัญๆ แต่ปกติ คนธรรมดาอย่างเราถ้าอยากให้ข้อมูลปลอดภัยมักจะใช้การ Backup ใช่ไหมครับ ใส่ใน Flash Drive Cloud Drive หรือ External HDD แต่นั่นเมื่อคุณทำงานเสร็จแล้ว แล้วบันทึกเก็บไว้หลายๆที่ แต่เมื่อข้อมูลเหล่านั้นคุณจำเป็นต้องใช้มันตลอดทั้งวันล่ะ เอาเวลาไหนมา Backup ครับ หากเกิดความเสียหาย ไฟดับ ฟ้าผ่า เครื่องแฮงค์ หรือทำงานอยู่แล้ว HDD พัง เมื่อต้องการตอบโจทย์เหล่าหรือจึงมีเทคโนโลยีที่เรียกว่า RAID (Redundant Array of Inexpensive Disks) เทคโนโลยีอันนี้จะเป็นการน้ำ HDD หลายๆลูกมาใช้ทำให้มันทำงานร่วมกันเหมือนเป็น HDD ลูกเดียว โดยการทำ RAID มีหลายแบบ และหลายวัตถุประสงค์ โดย RAID แบ่งออกเป็นประเภทที่นิยมใช้กันอยู่ทุกวันนี้ 3 แบบครับ

แบบที่ 1 Raid 0 (Striping) โดยการทำ RAID แบบนี้จะใช้ HDD 2 ลูก แบ่งกันเขียนข้อมูลลงไปทั้ง 2 ตัว เพื่อเพิ่มความเร็วในการจัดเก็บครับ โดย จะได้เนื้อที่เท่ากับ HDD ทั้ง 2 ลูก รวมกัน ครับ แต่ข้อเสียของการทำ RAID แบบนี้คือ หาก HDD ลูกใดลูกหนึ่งพัง ย่อมทำให้ข้อมูลทั้งหมดพังไปด้วยนั่นเองครับ

แบบที่ 2 RAID 1 (Mirroring) การทำ RAID 1 นี้ใช้ HDD 2 ลูกเช่นเดียวกัน แต่การทำงานจะต่างจาก RAID 0 ตรงที่ จะเขียนข้อมูลที่เหมือนกันลงใน HDD ทั้ง 2 ลูก เพื่อเป็นการ Backup กันเอง การทำ RAID แบบนี้ทำให้หาก HDD ลูกใดลูกหนึ่งเสีย ก็เพียงแค่เปลี่ยนลูกที่เสียข้อมูลก็จะไม่หายครับ RAID ชนิดนี้จึงเป็นที่นิยมกันมาก เนื่องจากต้นทุนถูกครับ แต่ข้อเสียคือ การเขียนข้อมูลอาจจะช้านิดหนึ่ง แต่ก็ไม่ได้ช้าน่าเกลียดขนาดนั้นครับ

แบบที่ 3 RAID 5 (Block-level striping) การทำ Raid 5 ใช้ HDD ขั้นต่ำ 3 ลูกครับ โดย Raid ประเภทนี้จะเป็น Raid ที่มีทั้งความเร็วและความปลอดภัยของข้อมูลมากกว่า 2 ขั้นต้น โดย Raid 5 นี้หาก HDD ลูกใดลูกหนึ่งเสีย ก็ยังสามารถใช้งานต่อได้อยู่ และสามารถนำ HDD ลูกใหม่มาเปลี่ยนได้ทันทีด้วยการ Hot swap โดยเนื้อที่ข้อมูลของ Raid 5 จะเท่ากับ 2 ใน 3 ของ Harddisk ทั้งหมด

จบแล้วครับ บทความสำหรับวันนี้ เดี๋ยวเรามาต่อตอนที่ 2 เรื่องเกี่ยวกับ การแจ้งเตือนสถานะ Harddisk S.M.A.R.T และ ระบบ Predictive Failure ของพวก Server กันครับ

ปล. หากบทความมีข้อความที่เขียนผิดช่วยแจ้งด้วยนะครับ พอดีรีบนิดหน่อยครับ